


Over the years I have interviewed and hired a good number of mechanical designers, and I have trained many more who were hired by someone else. At the end of almost every training course, one person waits until the room empties, comes to my desk and asks the same question in a slightly lowered voice: “I like this. But how do I actually get a job doing it?”
It is a fair question, and it deserves a straight answer, not a brochure. So here it is. Becoming a mechanical CAD designer is not about collecting software logos on a resume. It is about being able to take an idea, a sketch or a customer request, and turn it into a clean, buildable, well-documented design that a workshop can make without calling you. Everything in this guide serves that single goal.
I will walk you through what the job really is, the routes people take into it, the skills that matter, a twelve-month plan that works, how to get your first position, and how a career in this field typically grows. If you are not sure what MCAD is yet, start with What Is Mechanical CAD (MCAD)? A Complete Beginner’s Guide, then come back.
The Short Answer
To become a mechanical CAD designer you need four things, in this order:
- Modeling skill. You can build accurate, editable 3D parts and assemblies in at least one professional CAD system.
- Documentation skill. You can turn those models into correct manufacturing drawings and bills of materials.
- Manufacturing sense. You understand how parts are really made (machined, cut, bent, molded, welded, printed) and what that means for geometry and tolerances.
- Proof. You can show all this: a portfolio of real projects, and where useful a certification or a degree.
A degree or a diploma helps open doors, but I have worked with excellent designers who came from the workshop floor and with graduates who could not produce a usable drawing. Employers hire evidence of ability, not just evidence of attendance.
What a Mechanical CAD Designer Actually Does
Forget the stereotype of someone clicking in front of a screen all day. In a real office, a designer’s week looks more like this:
- Reading the problem. Talking to an engineer, a customer, a salesperson or a machinist to understand what is needed.
- Building models. Creating parts and assemblies, usually from sketches, specifications, existing products or supplier data.
- Checking fit and function. Running interference checks, verifying clearances, sometimes running a simple simulation.
- Documenting. Producing drawings with dimensions, tolerances, notes and bills of materials.
- Preparing manufacturing data. Exporting files for suppliers, flat patterns for laser cutting, models for CAM or 3D printing.
- Managing data. Naming, versioning and releasing files properly. This is a big part of the job and rarely mentioned in brochures.
- Handling changes. Updating designs when requirements, suppliers or production methods change.
- Communicating. Answering questions from the workshop, reviewing someone else’s model, explaining a decision to a manager.
Look at that list again. Only about half of it is “drawing in CAD”. The rest is thinking, checking and communicating, and that is exactly why employers value designers who do it well. The overall chain of activities is described in The Complete Mechanical CAD Workflow: From Concept to Manufacturing.
Job Titles: A Short Warning
The same work goes by many names: CAD technician, CAD operator, drafter, mechanical designer, design technician, design engineer, product designer. Companies use these titles loosely, and the same title can mean very different responsibilities in two different firms. Do not judge a job by its title; read what the person is actually expected to do. I explain the real differences between three of the most common ones in Mechanical Designer vs. Mechanical Engineer vs. Drafter.
Four Routes Into the Profession
There is no single door. These are the four routes I see most often, each with honest strengths and weaknesses.
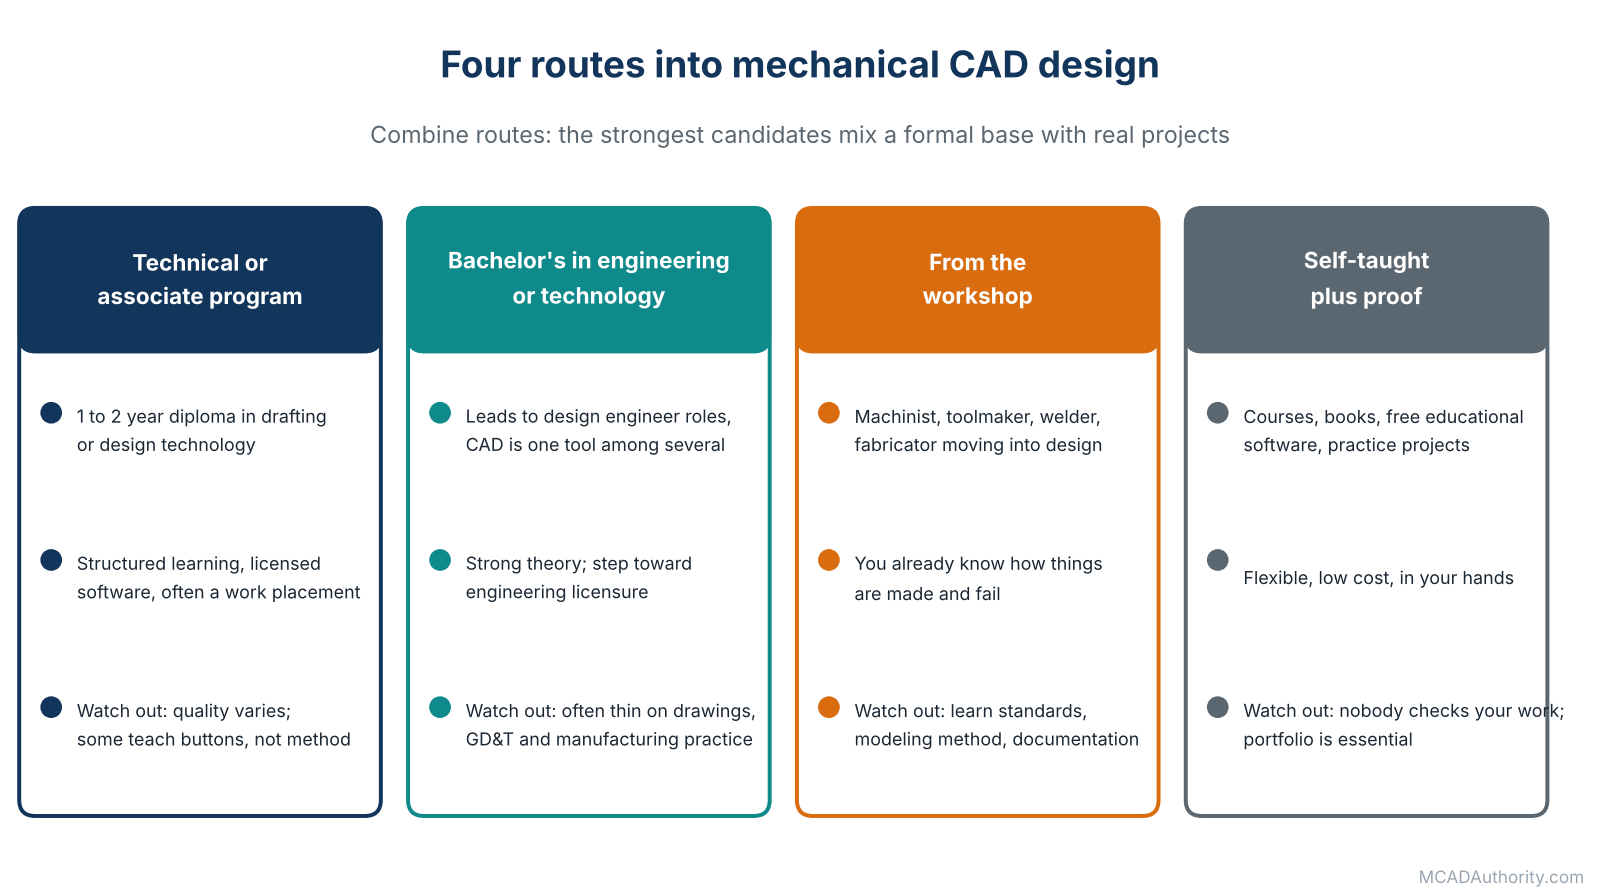
Figure 1. Four routes into the profession; the strongest candidates combine them.
Route 1: Technical or associate-level education
A one- to two-year program in drafting, mechanical design technology or a similar subject. In the United States, the Bureau of Labor Statistics lists an associate’s degree as the typical entry-level education for drafters, and other countries have equivalent technical diplomas.
- Strengths: structured learning, access to licensed software, exposure to standards, often a work placement.
- Weaknesses: quality varies a great deal between schools; some teach buttons instead of method.
Route 2: A bachelor’s degree in engineering or engineering technology
Often leads to a design engineer position, with CAD as one of several tools.
- Strengths: strong theoretical base (mechanics, materials, thermodynamics), wider career options, a necessary step toward professional engineering licensure.
- Weaknesses: many graduates arrive with theory but little drawing, GD&T or manufacturing practice. Closing that gap yourself makes you stand out.
Route 3: From the workshop
Machinists, toolmakers, welders, sheet metal fabricators and maintenance technicians who move into design. This is one of the best routes I know.
- Strengths: you already understand how things are made and what goes wrong. Your designs will be more buildable than those of most newcomers.
- Weaknesses: you may need to learn drawing standards, modeling strategy and documentation habits, and you may lack a formal credential.
Route 4: Self-taught plus proof
Learning with online courses, books, free educational software and practice projects, then proving it with a portfolio and, optionally, certifications.
- Strengths: flexible, low cost, and entirely in your hands.
- Weaknesses: no one checks your work, so you must create your own feedback loop. Without a portfolio, this route rarely works.
My advice: combine routes. The strongest candidates I have seen mix a formal base with real projects, or a workshop background with a certification and a portfolio.
The Skills That Matter
I group them in three families. Employers want all three, in different proportions at different levels.
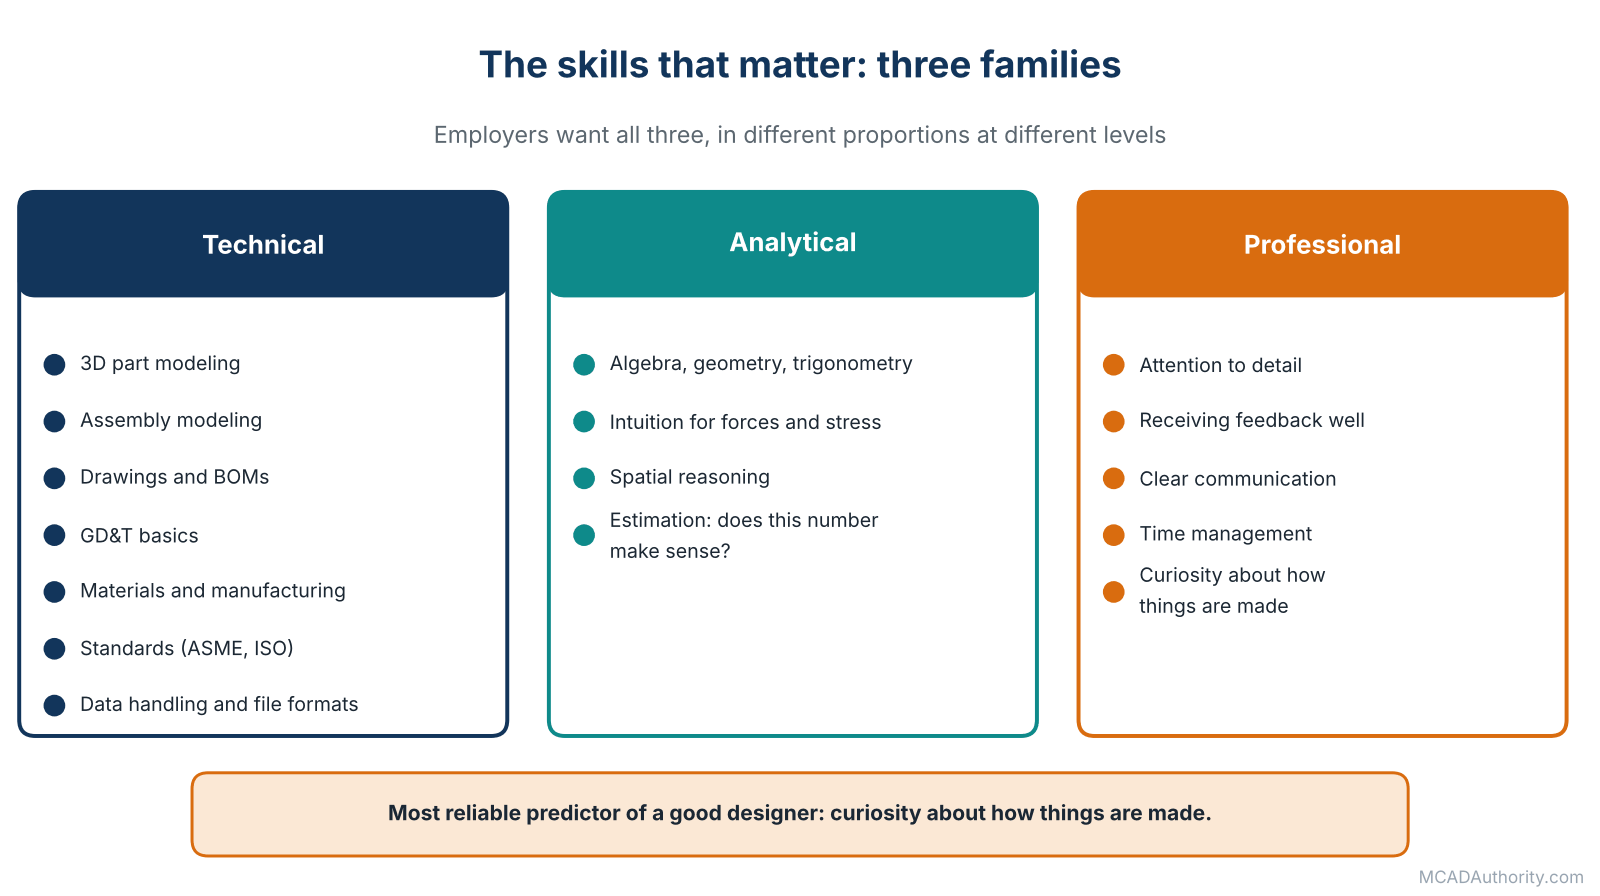
Figure 2. Employers want all three families of skills.
Technical skills
- 3D part modeling: fully defined sketches, sensible feature order, parametric thinking. See Parametric 3D Modeling: A Complete Practical Guide.
- Assembly modeling: constraints that reflect reality, structure that matches how the product is built. See Assembly Modeling in Mechanical CAD: A Complete Guide.
- Drawings: projection, sections, dimensioning, tolerances, notes. See Mechanical Engineering Drawings: A Complete Guide.
- GD&T: at least the ability to read and apply the basics. See Geometric Dimensioning and Tolerancing (GD&T): A Complete Guide.
- Materials and manufacturing: what steel, aluminum and plastics do; how milling, turning, bending, molding, welding and printing constrain a design. See Design for Manufacturing (DFM) and Design for Assembly (DFA): A Complete Guide.
- Standards: the drawing and tolerancing standards used in your industry (ASME, ISO and others).
- Data handling: file naming, versions, revisions, neutral formats such as STEP. See Mechanical CAD File Formats: A Complete Guide.
Analytical skills
You need less mathematics than you fear: comfortable algebra, basic trigonometry and geometry, unit conversions, and a feeling for forces, moments and stress at an intuitive level. More important is spatial reasoning, the ability to see an object in your head from several directions, and estimation, the habit of asking “does this number make sense?” before you trust it.
Professional skills
- Attention to detail, without which a drawing is a liability.
- Receiving feedback. The best designers I know ask to be reviewed and say thank you when someone finds an error.
- Clear communication, written and spoken, with engineers and with people in the workshop.
- Time management. Knowing how long a task really takes, and saying so early.
- Curiosity about how things are made. The single most reliable predictor of a good designer that I have found.
Which Software Should You Learn First?
This is the question I am asked most often, and my answer is always the same: learn the concepts on one system, and choose the system by looking at your local job market.
- Read twenty job advertisements in your region and industry. Count which systems appear.
- Check what the companies around you actually use. Machinery builders, automotive suppliers and consumer product firms often differ.
- Take advantage of free educational or trial access, which most major vendors offer to students and learners; verify the current terms on their official websites, because they change.
- Once you master one system, learning a second takes weeks, not years, because the logic of sketches, features, constraints and drawings is shared.
Among the systems I teach and meet most often are Autodesk Inventor and Fusion, SOLIDWORKS, Creo, Siemens NX and CATIA, with AutoCAD still very common for 2D drafting. For orientation, see Best Mechanical CAD Software for Professional Engineers. Do not waste months comparing; pick one and build things.
A Twelve-Month Roadmap That Works
This plan assumes about ten hours per week. Adjust to your situation, but keep the order.
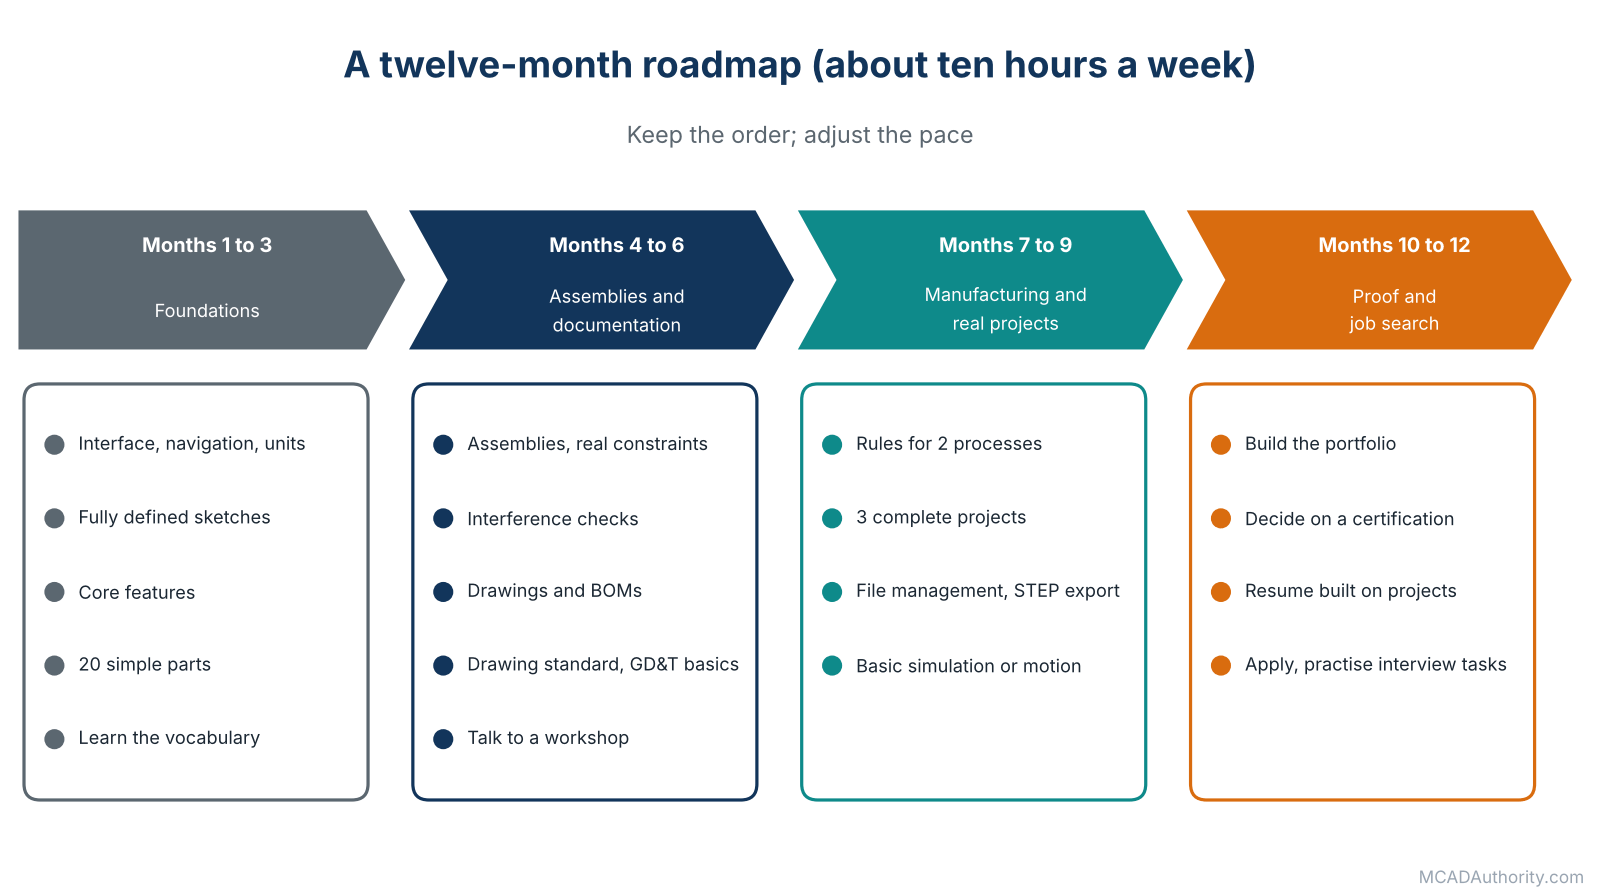
Figure 3. A twelve-month roadmap, about ten hours a week.
Months 1 to 3: Foundations
- Learn the interface, navigation and units of your chosen CAD system.
- Master sketching until you routinely produce fully defined sketches.
- Learn the core features: extrude, revolve, sweep, loft, hole, fillet, chamfer, shell, pattern, mirror.
- Model 20 simple parts from drawings, from real objects on your desk, from a calliper and a ruler. See Mechanical CAD Practice Exercises for Beginners.
- Learn the vocabulary. Essential Mechanical CAD Terminology Every Designer Should Know is a good companion.
Months 4 to 6: Assemblies and documentation
- Build assemblies with real constraints and check interference.
- Create drawings: views, sections, details, dimensions, tolerances, title blocks.
- Generate bills of materials.
- Read the basics of your drawing standard and of GD&T.
- Visit or talk to a workshop, a machinist, a sheet metal shop or a 3D printing service. Ask what makes a drawing easy or hard to use.
Months 7 to 9: Manufacturing and real projects
- Learn the design rules for at least two processes: machining and sheet metal are an excellent pair; add plastics or 3D printing if relevant to your market.
- Complete three substantial projects from start to finish: model, assembly, drawings, BOM. Each should include a decision you can explain (“I chose this wall thickness because…”).
- Learn file management: naming, versions, STEP export, and what makes a package ready for a supplier.
- Start basic simulation or motion analysis if your software includes it.
Months 10 to 12: Proof and job search
- Build your portfolio. See How to Build a CAD Portfolio That Gets You Hired.
- Decide whether a certification would help in your market. See CAD Certifications Guide (CSWA, CSWP, CSWE, Autodesk, CATIA).
- Prepare your resume around projects and results, not lists of software.
- Apply, practice interview tasks, and ask for feedback after each interview.
No Experience? Create It
“You need experience to get experience” is the oldest complaint in the profession, and it has a practical answer: manufacture your own experience. Here is what works.
- Reverse engineer an everyday object. A clamp, a tap, a drill chuck, a bicycle component. Measure it, model every part, assemble it, draw it, compare your drawing with reality. See Reverse Engineering: From 3D Scanning to Editable CAD Models.
- Redesign something badly designed. Document what is wrong and what you changed.
- Design a small machine or fixture and have a part 3D printed or cut by a local service, so you learn what happens between screen and workshop.
- Help a local workshop or maker space with drawings. Even unpaid work yields real feedback and a project for your portfolio, if the owner agrees to your showing it.
- Take an internship or a technician job even if it looks modest. Everything in a design office is learned by doing real work next to experienced people.
- Contribute to open projects where design files are shared, always respecting licenses.
Keep records of what you did, why and what you learned. Those notes become portfolio pages and interview stories.
Getting Your First Job
Where to look
- Manufacturers, machine builders and fabrication shops near you.
- Engineering services firms and design offices.
- Companies that sell and support CAD software and training, which often hire junior technicians.
- Staffing agencies that place technical contract staff.
- Your own network: teachers, former colleagues, the machinist you spoke to during your projects.
What a hiring manager actually checks
When I screen candidates, I do the following, in this order:
- I open the portfolio before I finish the resume.
- I look at one drawing in detail. Are views correct? Are dimensions placed logically? Are tolerances and notes sensible?
- I look for evidence of thinking: a note explaining a choice, an alternative considered, a problem solved.
- I check the basics of file hygiene: clean names, a tidy feature tree if models are shared.
- In the interview, I ask the candidate to walk me through one project. I listen for ownership and honesty.
Typical interview tasks
- A modeling test: build a part from a drawing in a limited time.
- A drawing review: find errors in a deliberately flawed drawing.
- A short design problem: “How would you hold this part for machining?”
- A project walkthrough: the most revealing of all.
Practice each of these. Time yourself. And when you do not know something, say so, then explain how you would find out. That answer earns more respect than a bluff.
Your First Two Years
The first job is where your real education begins. These are the habits that will accelerate you.
- Ask for review, every time. Send your drawing to a colleague before it is released and say “please try to find something wrong”.
- Walk to the workshop. Watch parts being made. Ask what annoys the machinists about your drawings.
- Learn the company standards, then understand why they exist.
- Keep a personal list of mistakes. Mine has about two hundred entries and is the most valuable document I own.
- Learn adjacent skills: GD&T, simulation, CAM basics, data management, automation. See Mechanical CAD Automation: A Complete Guide.
- Take ownership of something, even small: a library, a template, a checklist.
How a Career Typically Grows
Titles differ, but the progression follows a recognizable pattern.
| Stage | Typical focus | What changes next |
|---|---|---|
| CAD technician / junior designer | Models and drawings from clear instructions | You learn to question the instructions |
| Mechanical designer | Complete small designs; supports engineers | You take on whole subsystems |
| Senior designer / design engineer | Own assemblies, make design decisions, review others | You start shaping methods and mentoring |
| Lead designer / CAD manager | Standards, templates, data management, training, team | You work through people, not just models |
| Specialist or engineer | Surfacing, simulation, tolerancing, automation, or a degree-based engineering path | Depth, or a change of discipline |
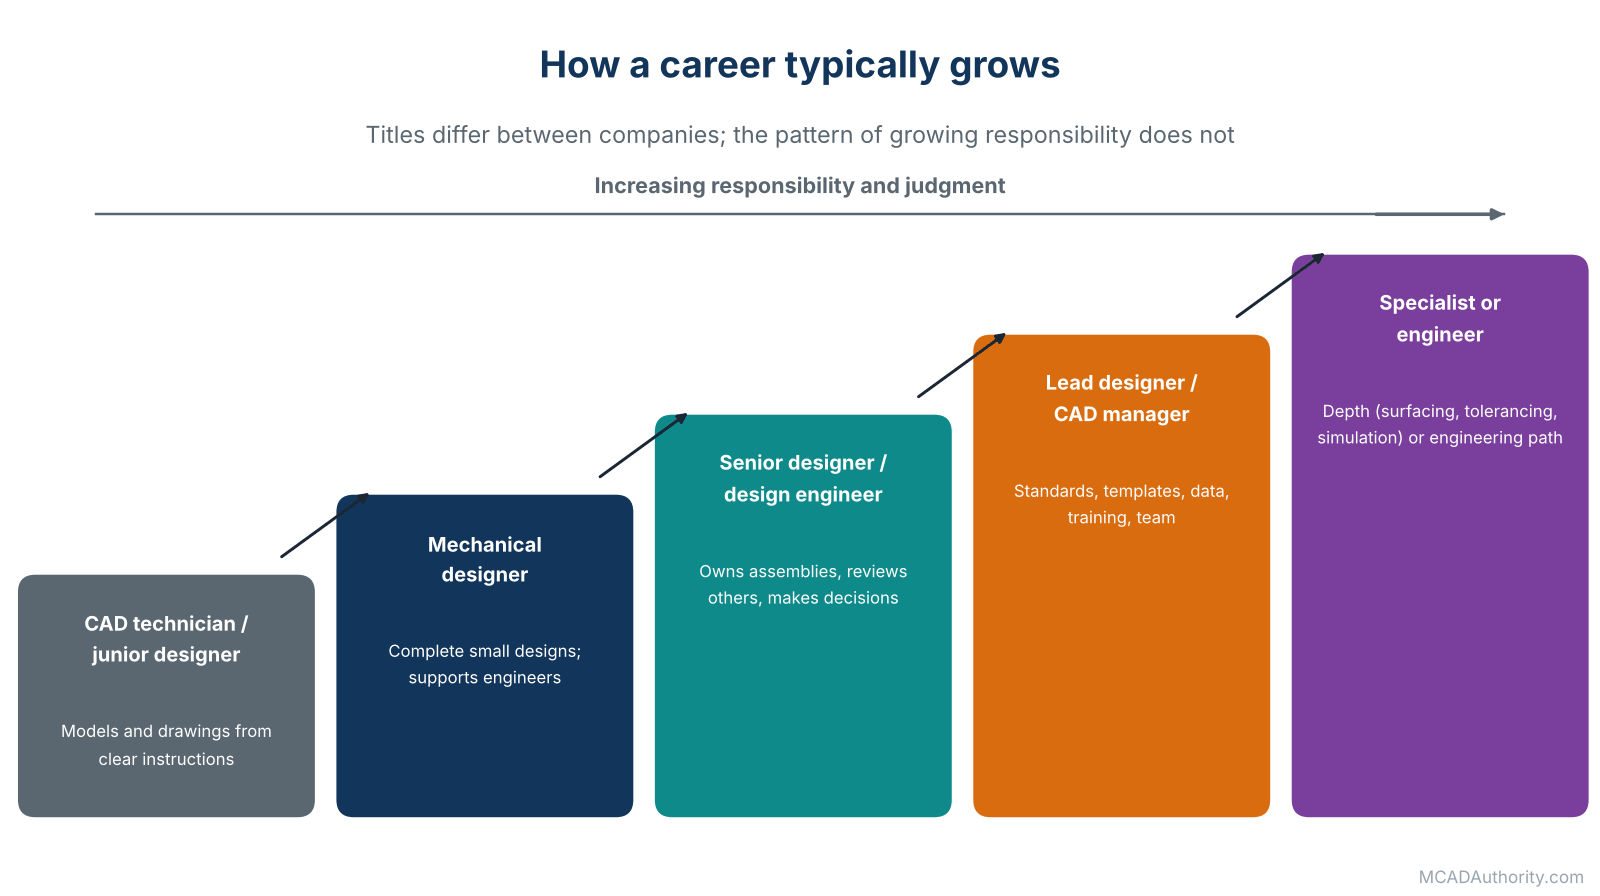
Figure 4. Titles differ between companies; the growth in responsibility does not.
Many designers also move into sales engineering, technical support or training for CAD providers, or into freelancing. For that path, see Freelancing as a CAD Designer: Getting Started.
Money and Outlook: A Brief, Honest Note
Pay and demand depend heavily on country, industry and specialization, so I give a full treatment in MCAD Salaries and Job Outlook. As an anchor, the U.S. Bureau of Labor Statistics reports a median annual wage of $68,090 for drafters in May 2025, with employment projected to grow 1 percent from 2025 to 2035, while mechanical engineers had a median of $104,110 with projected growth of 11 percent over the same period. Those numbers describe the United States only; check local sources for your own market. The important lesson is that pure drawing work is under pressure from automation and from engineers who can model, while designers who combine modeling, manufacturing knowledge, standards and communication remain valuable. Build the combination.
Mistakes That Slow Beginners Down
- Tutorial hell: following video after video without ever creating something of your own.
- Software hopping: changing systems every month. Depth beats breadth early on.
- Skipping drawings: loving 3D and neglecting documentation, which is what suppliers actually read.
- Ignoring manufacturing: designing parts nobody can make.
- Hiding work from review: waiting until it is perfect, which means never.
- Messy files: names such as
final2_new. See Mechanical CAD File Naming and Part Numbering Standards.
I devote a whole guide to this subject: Common Mistakes Beginners Make in Mechanical CAD.
Frequently Asked Questions
Do I need a degree? Not always for design and drafting roles, but it helps, and some employers require it. For engineering roles it is usually necessary. A strong portfolio and relevant experience can offset a missing credential in many design positions.
How good must my mathematics be? Comfortable with algebra, geometry and basic trigonometry. Engineering roles need more. Spatial reasoning matters more than advanced mathematics for modeling work.
Can I learn entirely on my own? Yes, but you need feedback. Find a mentor, join a user community, or ask a workshop to critique your drawings.
Is it too late for me to start? No. I have trained people who changed career well into their forties and fifties. Manufacturing experience from a previous job is often an advantage.
Can I work remotely? Some design work can be done remotely, especially for experienced people with a proven record, but many companies prefer juniors on site, where learning from colleagues and the workshop is faster.
Which industry should I choose? The one whose products you find interesting. The skills transfer, and you will learn faster when you care about what you are making.
Final Thoughts
The profession has changed beyond recognition since I started at a drafting board, and it will change again. Software will get smarter, assistants will draft faster, and routine tasks will keep being automated. What does not change is the value of a person who understands how something will be made and can describe it clearly enough that others can make it right the first time.
Build that person. Learn one system deeply, learn how things are made, document with care, show your work and keep learning. The door is open to anyone willing to do the work.
Where to go next: read Mechanical Designer vs. Mechanical Engineer vs. Drafter to understand the roles around you, then How to Build a CAD Portfolio That Gets You Hired to start building your proof.